
Love beautiful code? We do too.


Giới thiệu về Spring Boot
Theo số liệu thống kê Top Java Web Frameworks được sử dụng nhiều nhất tính đến năm 2016 từ LZEBELLABS:
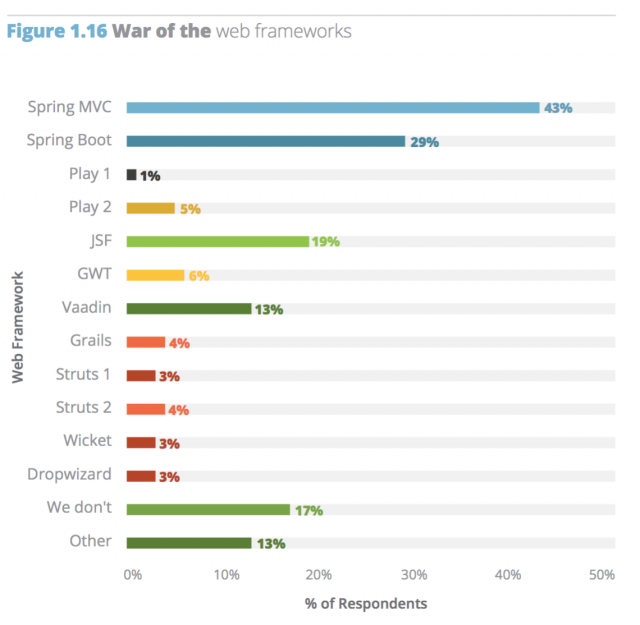
Ta có thể thấy rõ mặc dù khá là non trẻ về tuổi đời (phiên bản chính thức v1.0 phát hành năm 2014) nhưng Spring Boot đã có những bước phát triển vô cùng mạnh mẽ để vị trí thứ 2 bảng xếp hạng, chỉ sau Framework Spring MVC.
Vậy Spring Boot là gì? Tại sao nó lại phát triển nhanh đến thế ?
- Spring Boot là 1 sự sáng kiến lớn trên sự tồn tại của Spring Framework đến từ nhóm Spring Team.
- Spring Boot được xây dựng trên nền tảng Spring nhưng đã được giảm tải các cấu hinh(configuration) cho quá trình phát triển được nhanh chóng hơn bao giờ hết.
- Spring Boot cung cấp mặc định các đoạn code và annotation configuration để phát triển dự án Spring trong thời gian ngắn.
Những lợi thế của Spring Boot:
- Nó dễ dàng cho việc phát triển ứng dụng dựa trên Spring với Java hoặc Groovy
- Nó giảm thiểu thời gian phát triển, tăng năng suất phát triển
- Tránh việc phải viết nhiều bản mẫu code, cấu hình Annotaion hoặc XML
- Dễ dàng trong việc tích hợp với hệ sinh thái của Spring như: Spring JDBC, Spring ORM, Spring Data, Spring Security...
- Nó theo cách tiếp cận "Opinionated Defaults Configuration" để giảm effort trong quá trình phát triển.
- Nó cung cấp các Embedded HTTP servers như Tomcat, Jetty... để phát triển và test một cách dễ dàng,
- Nó cung cấp công cụ CLI (command Line Interface) cho việc phát triển và test ứng dụng nhanh chóng và dễ dàng từ command line.
- Nó cung cấp rất nhiều các plugins để phát triển và test các ứng dụng Spring Boot nhanh chóng sử dụng các công cụ Build như Maven và Gradle
- Cung cấp nhiều plugins để làm việc với các embedded and in-memory databases

Tạo Hello Spring Boot Project.
Các công nghệ sử dụng:
- Spring Boot 1.4.3.RELEASE
- Spring 4.3.5.RELEASE
- Maven 3.3.9
- JDK 1.8
- IntellIJ
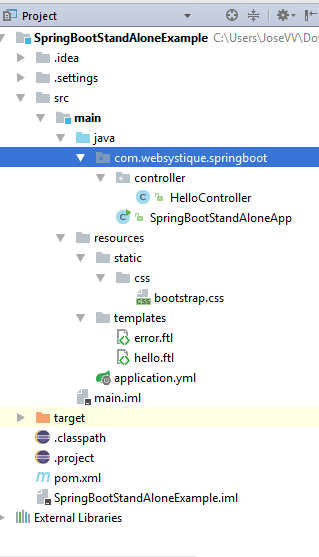
Cấu trúc thư mục project:
Thêm các dependency vào file pom.xml của project:
<project xmlns="http://maven.apache.org/POM/4.0.0" xmlns:xsi="http://www.w3.org/2001/XMLSchema-instance"
    xsi:schemaLocation="http://maven.apache.org/POM/4.0.0 http://maven.apache.org/xsd/maven-4.0.0.xsd">
    <modelVersion>4.0.0</modelVersion>

    <groupId>com.websystique.springboot</groupId>
    <artifactId>SpringBootStandAloneExample</artifactId>
    <version>1.0.0</version>
    <packaging>jar</packaging>

    <name>SpringBootStandAloneExample</name>

    <parent>
        <groupId>org.springframework.boot</groupId>
        <artifactId>spring-boot-starter-parent</artifactId>
        <version>1.4.3.RELEASE</version>
    </parent>

    <properties>
        <java.version>1.8</java.version>
        <!-- Additionally, Please make sure that your JAVA_HOME is pointing to
            1.8 when building on commandline -->
    </properties>

    <dependencies>
        <!-- Add typical dependencies for a web application -->
        <!-- Adds Tomcat and Spring MVC, along others -->
        <dependency>
            <groupId>org.springframework.boot</groupId>
            <artifactId>spring-boot-starter-web</artifactId>
        </dependency>
        <dependency>
            <groupId>org.springframework.boot</groupId>
            <artifactId>spring-boot-starter-freemarker</artifactId>
        </dependency>
    </dependencies>
    <build>
        <plugins>
            <plugin><!-- Include if you want to make an executable jar[FAT JAR which
                    includes all dependencies along with sprinboot loader] that you can run on
                    commandline using java -jar NAME -->
                <!-- If you are not including it, result would be just a regular jar.
                You could run the project using mvn spring-boot:run [on project root directory]-->
                <groupId>org.springframework.boot</groupId>
                <artifactId>spring-boot-maven-plugin</artifactId>
            </plugin>
        </plugins>
    </build>
</project>
Thêm 'Main' class cho project:
Hàm main là tất cả những gì chúng ta cần để tạo mới 1 spring boot app. Spring Boot cung cấp SpringApplication class để khởi động cho ứng dụng Spring từ hàm main() sử dụng static method SpringApplicaiton.run: package com.websystique.springboot;
import org.springframework.boot.SpringApplication;
import org.springframework.boot.autoconfigure.EnableAutoConfiguration;
import org.springframework.context.annotation.ComponentScan;

@EnableAutoConfiguration
@ComponentScan("com.websystique.springboot")
//OR JUST USE @SpringBootApplication(scanBasePackages={"com.websystique.springboot"})// same as @Configuration @EnableAutoConfiguration @ComponentScan combined
public class SpringBootStandAloneApp {

    public static void main(String[] args) {
        SpringApplication.run(SpringBootStandAloneApp.class, args);
    }
}
Trong class được chú thích với @EnableAutoConfiguration và @ComponentScan. Spring Boot @EnableAutoConfiguration cố gắng configure tự động ứng dụng Spring dựa trên jar dependency mà chúng ta đã thêm vào project. Khi chúng ta thêm spring-boot-starter-web, Spring boot sẽ setup cấu hình cho ứng dụng web. @ComponentScan sẽ giúp spring beans xác định được vị trí mà ứng dụng cần.
Thêm Controller
package com.websystique.springboot.controller;

import org.springframework.stereotype.Controller;
import org.springframework.ui.ModelMap;
import org.springframework.web.bind.annotation.RequestMapping;

@Controller
public class HelloController {

    @RequestMapping("/")
    String home(ModelMap modal) {
        modal.addAttribute("title", "SPRING BOOT - HELLO WORLD!");
        modal.addAttribute("message", "Welcome to SpringBoot");
        return "hello";
    }
}
Thêm properties file
- Do ứng dụng sẽ được chạy trên container đã được embedded, chúng ta cần cấu hình port, context-path cho ứng dụng. Mặc duf chúng ta có thể sử dụng thuộc tính .properties file truyền thống thì Spring Boot lại hỗ trợ tốt cho YAML , cung cấp thư viện SnakeYAML là classpath. Đây là trường hợp khi sử dụng spirng-boot-starters. YAML file là tập file tốt trong việc thể hiện dữ liệu phân cấp. Property/yml file thường được đặt trong src/main/resources.
- Chỉnh sửa file application.yml
server:
  port: 8080
  contextPath: /SpringBootStandAloneExample
Thêm views:
- Trong ví dụ này ta sẽ sử dụng Freemarker template. Spring Boot WebMvcAutoConfiguration thêm FreeMarkerViewResolver với id 'freeMarkerViewResolver' nếu freemarker trong classpath. Đây là trường hợp khi chúng ta sử dụng spring-boot-starter-freemarker. Nó sẽ tìm kiếm trong resources trong loader path bằng cách tìm kiếm quanh các view name có tiền tố (prefix) rống và hậu tố (suffix) là '.ftl'
- Chỉnh sửa file: hello.ftl:
<!DOCTYPE html>

<html lang="en">
<head>
  <link rel="stylesheet" type="text/css" href="css/bootstrap.css" />
</head>
<body>
  <div class="container">
      <div class="jumbotron">
          <h2>${title}</h2>
          <p>${message}</p>
      </div>
  </div>
</body>
</html>
Error Page

src/main/resources/templates/error.ftl
<!DOCTYPE html>

<html lang="en">
<head>
    <link rel="stylesheet" type="text/css" href="css/bootstrap.css" />
</head>
<body>
    <div class="container">
        <div class="jumbotron alert-danger">
            <h1>Oops. Something went wrong</h1>
            <h2>${status} ${error}</h2>
        </div>
    </div>
</body>

</html>
Statics resources
Trong ví dụ này chúng ta sử dụng boostrap.css đặt trong src/main/resources/static/css
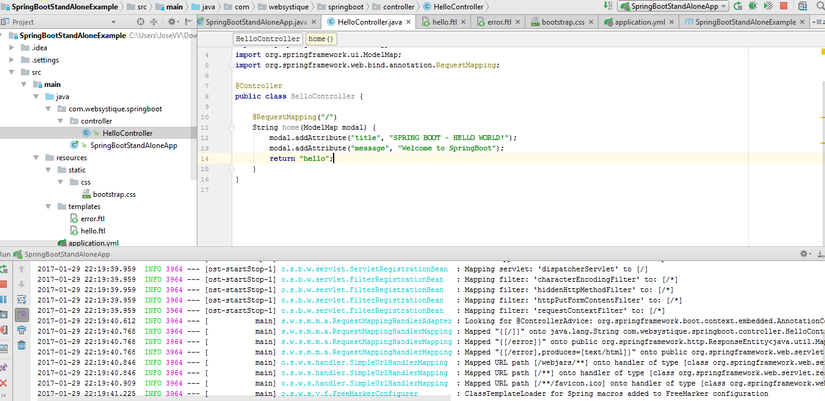
Run application
Chọn main class [SpringBootStandAloneApp] trong IDE, sau đó run as -> java application Kết quả:
Build project thành công:
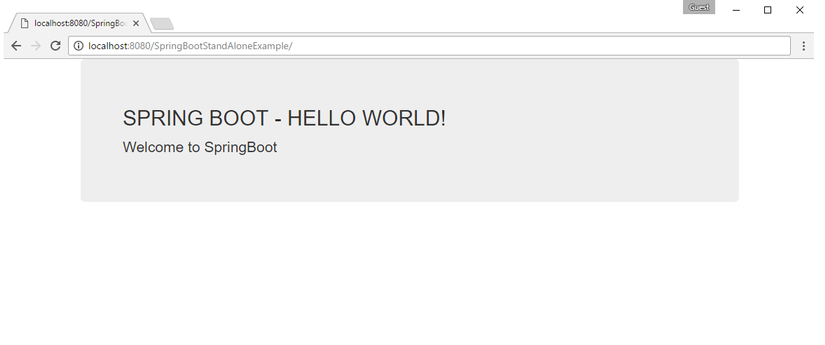
Kết quả chạy:
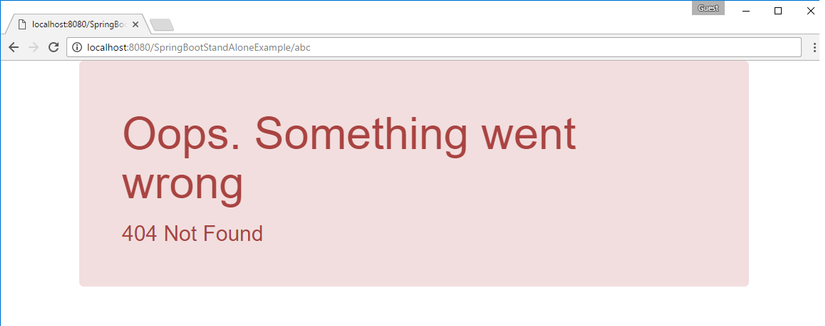
Thử truy cập url không tồn tại:
Unpublished comment
Viết câu trả lời