
Love beautiful code? We do too.


Quay trở lại với seri bootstrap, hôm nay tôi sẽ giới thiệu với các bạn cách tạo carousel bằng bootstrap. Vậy carousel là gì? Carousel là 1 plugin trong bootstrap nói riêng và jquery nói chung dùng để duyệt các phần tử (hình ảnh, slide, …) tuần tự xoay vòng, tương tự như 1 slideshow (trình chiếu). Để xây dựng carousel, bạn có thể nhúng tập tin “carousel.js” độc lập hoặc nhúng “bootstrap.js” hay “bootstrap.min.js” có sẵn trong Bootstrap. Bây giờ, chúng ta cùng sẵn sàng đi tìm hiểu cách tạo carousel đơn giản với bootstrap nhé.
1. Tạo carousel đơn giản
Đầu tiên, chúng ta tạo 1 đoạn HTML như thế này:
<div id="main">
  <div class="container">
    <h1>Carousel with bootstrap</h1>
    <div id="carousel-simple" class="carousel slide col-md-6 col-md-offset-3" data-ride="carousel">
      <!-- Indicators -->
      <ol class="carousel-indicators">
        <li data-target="#carousel-simple" data-slide-to="0" class="active"></li>
        <li data-target="#carousel-simple" data-slide-to="1"></li>
        <li data-target="#carousel-simple" data-slide-to="2"></li>
        <li data-target="#carousel-simple" data-slide-to="3"></li>
      </ol>

      <!-- Wrapper for slides -->
      <div class="carousel-inner" role="listbox">
        <div class="item active">
          <img src="media/products/2.png" alt="">
        </div>
        <div class="item">
          <img src="media/products/3.png" alt="">
        </div>
        <div class="item">
          <img src="media/products/17.png" alt="">
        </div>
        <div class="item">
          <img src="media/products/24.png" alt="">
        </div>
      </div>

      <!-- Controls -->
      <a class="left carousel-control" href="#carousel-simple" role="button" data-slide="prev">
        <i class="fa fa-chevron-left" aria-hidden="true"></i>
      </a>
      <a class="right carousel-control" href="#carousel-simple" role="button" data-slide="next">
        <i class="fa fa-chevron-right" aria-hidden="true"></i>
      </a>
    </div>
  </div>
</div>
Thử chạy đoạn HTML bên trên, chúng ta sẽ có kết quả hiển thị như thế này:
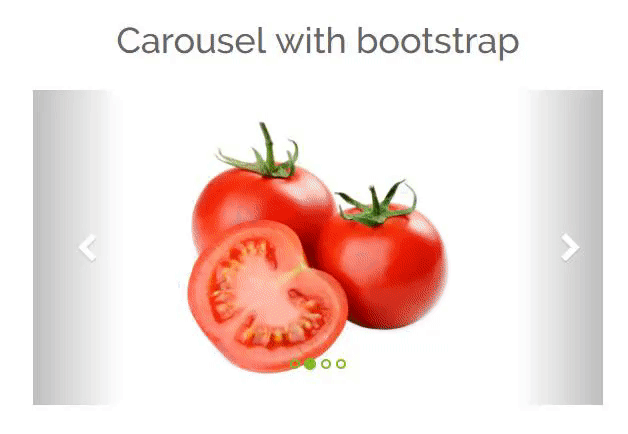
Bây giờ tôi sẽ đi giải thích chi tiết các thành phần của carousel dựa trên đoạn HTML như sau.
-
Phần tử div ngoài cùng có:
- ** id="carousel-simple"** dùng để định nghĩa 1 carousel. Các button điều khiển (next, prev) hay Indicators sẽ thông qua id này để giúp chúng ta có thể thao tác xem slide tiếp theo hoặc slide trước đó. Nếu không tin, bạn có thể xóa id này trong phần control hoặc Indicators là biết liền. Sẽ không thể thao tác lên các phần này để xem phần slide mới hoặc quay lại xem slide cũ ngay lập tức. Muốn xem slide tiếp theo phải đợi auto next còn xem ảnh cũ hả, cứ đợi nó chạy hết 1 vòng nhé.
- class .carousel để mô tả thẻ div này chứa 1 carousel. Bạn có thể sử dụng class này trong script để thay đổi các option cho carousel. Các option của carousel là gì thì tôi sẽ nói ở phần sau.
- class .slide để thêm các hiệu ứng động và chuyển tiếp, làm cho 1 đối tượng sẽ có hiệu ứng trượt khi hiển thị mới, nếu bạn không muốn có hiệu ứng này thì bỏ qua không định nghĩa.
- Thuộc tính data-ride=”carousel” nhằm kích hoạt hiệu ứng hoạt hình sẽ lập tức hoạt động khi trang được tải.
-
Phần “Indicators”: Là các chấm tròn màu xanh ở dưới slide như ảnh demo bên trên. Phần này cho chúng ta biết số phần tử slide hiện có và slide nào đang được hiển thị trong carousel này. Phần này có 2 thuộc tính cơ bản:
- Thuộc tính data-target để chỉ đến id của carousel. Như trên tôi đã giải thích. Thông qua id của carousel, chúng ta có thể thao tác lên các phần tử slide. Chẳng hạn bạn muốn xem slide tiếp hoặc slide trước đó, bạn cũng có thể click vào các chấm tròn này thay vì click vào các button control.
- Thuộc tính data-slide-to dùng để truyền chỉ số của một slide. Nó có tác dụng chuyển vị trí slide tới một vị trí có chỉ số cụ thể tính từ 0.
-
Phần “Wrapper for slides” được định nghĩa bên trong thẻ div với class .carousel-inner. Nội dung của mỗi slide sẽ được định nghĩa trong class .item, nội dung này có thể là hình ảnh hoặc văn bản. Class .active để mô tả slide nào đang được hiển thị.
- Phần “Left and right controls” là các nút cho phép người dùng xem hình ảnh trước sau khi nhấn chuột lên các nút này. Thuộc tính data-slide cho phép dùng từ khóa “prev” hay “next”, để định nghĩa vị trí tiếp theo của 1 slide
2. Thêm caption cho carousel
Để thêm caption vào các slide trong 1 carousel, đơn giản là thêm phần tử div class=”carousel-caption” bên trong mỗi phần tử div class=”item” để tạo chú thích cho mỗi slide. Bạn hãy chèn bất kỳ mã HTML nào vào trong caption đó và nó sẽ được định dạng và căn chỉnh một cách tự động.
<div class="item">
<img src="media/products/3.png" alt="">
<div class="carousel-caption">
<h3>There are 3 red tomatoes</h3>
<p>They are so fresh</p>
</div>
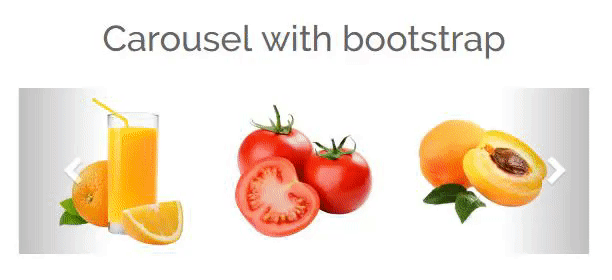
</div>Kết quả thu được là:

3. Hiển thị nhiều item trong 1 slide
Trong phần trên, chúng ta vừa đi tìm hiểu cách tạo 1 carousel đơn giản: 1 slide hiển thị 1 item. Vậy trong trường hợp muốn nhiều item thì chúng ta làm thế nào? Hãy theo dõi đoạn HTML dưới đây
<div id="main">
  <div class="container">
    <h1>Carousel with bootstrap</h1>
    <div id="carousel-simple" class="carousel multi-item-carousel slide col-md-6 col-md-offset-3" data-ride="carousel">

      <!-- Wrapper for slides -->
      <div class="carousel-inner" role="listbox">
        <div class="item active">
          <div class="col-md-4">
            <img src="media/products/2.png" alt="">
          </div>
        </div>
        <div class="item">
          <div class="col-md-4">
            <img src="media/products/3.png" alt="">
          </div>
        </div>
        <div class="item">
          <div class="col-md-4">
            <img src="media/products/17.png" alt="">
          </div>
        </div>
        <div class="item">
          <div class="col-md-4">
            <img src="media/products/24.png" alt="">
          </div>
        </div>
        <div class="item ">
          <div class="col-md-4">
            <img src="media/products/12.png" alt="">
          </div>
        </div>
        <div class="item">
          <div class="col-md-4">
            <img src="media/products/13.png" alt="">
          </div>
        </div>
        <div class="item">
          <div class="col-md-4">
            <img src="media/products/21.png" alt="">
          </div>
        </div>
        <div class="item">
          <div class="col-md-4">
            <img src="media/products/22.png" alt="">
          </div>
        </div>
        <div class="item ">
          <div class="col-md-4">
            <img src="media/products/23.png" alt="">
          </div>
        </div>
        <div class="item">
          <div class="col-md-4">
            <img src="media/products/9.png" alt="">
          </div>
        </div>
        <div class="item">
          <div class="col-md-4">
            <img src="media/products/10.png" alt="">
          </div>
        </div>
        <div class="item">
          <div class="col-md-4">
            <img src="media/products/11.png" alt="">
          </div>
        </div>
      </div>

      <!-- Controls -->
      <a class="left carousel-control" href="#carousel-simple" role="button" data-slide="prev">
        <i class="fa fa-chevron-left" aria-hidden="true"></i>
      </a>
      <a class="right carousel-control" href="#carousel-simple" role="button" data-slide="next">
        <i class="fa fa-chevron-right" aria-hidden="true"></i>
      </a>
    </div>
  </div>
</div>
Bởi vì đây là trường hợp custom lại plugin dựa trên bootstrap nên chắc chắn phải có thêm 1 đoạn custom javascript cho phần này
<script type="text/javascript">
  $('.multi-item-carousel .item').each(function(){
    var next = $(this).next();
    if (!next.length) {
      next = $(this).siblings(':first');
    }
    next.children(':first-child').clone().appendTo($(this));

    if (next.next().length>0) {
      next.next().children(':first-child').clone().appendTo($(this));
    } else {
      $(this).siblings(':first').children(':first-child').clone().appendTo($(this));
    }
  });
</script>
Cùng với đó là thêm 1 đoạn custom css
.multi-item-carousel{
  .carousel-inner{
    > .item{
      transition: 500ms ease-in-out left;
    }
    .active{
      &.left{
        left:-33%;
      }
      &.right{
        left:33%;
      }
    }
    .next{
      left: 33%;
    }
    .prev{
      left: -33%;
    }
    @media all and (transform-3d), (-webkit-transform-3d) {
      > .item{
        // use your favourite prefixer here
        transition: 500ms ease-in-out left;
        transition: 500ms ease-in-out all;
        backface-visibility: visible;
        transform: none!important;
      }
    }
  }
}
Unpublished comment
Viết câu trả lời