
Love beautiful code? We do too.
- Home
- Tutorial
- Hàm jQuery
- .mouseleave() trong jQuery


Định nghĩa và sử dụng .mouseleave() trong jQuery
.mouseleave(): Ràng buộc một xử lý tới một sự kiện mouseleave (di chuyển chuột ra khỏi thành phần), hoặc kích hoạt sự kiện mouseleave lên một thành phần.
Khác biệt giữa mouseleave và mouseout là:
- .mouseleave(): Khi di chuyển chuột từ thành phần cha lên thành phần con, thì vẫn được hiểu là đang ở thành phần cha.
- .mouseout(): Khi di chuyển chuột từ thành phần cha lên thành phần con, mặc dù vẫn trong thành phần cha, nhưng nếu di duyển chuột lên thành phần con thì được tính như là đã thoát khỏi thành phần cha.
-
Xem ví dụ để hiểu rõ mouseleave và mouseout
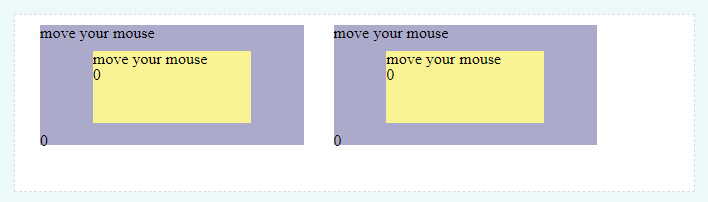
Sự khác biệt khi có sự di chuyển lên thành phần con.
Cấu trúc .mouseleave() trong jQuery
Đã được thêm vào từ phiên bản 1.0
.mouseleave()

$('img').mouseleave();
.mouseleave(function(){...})
$('img').mouseleave(function(){
alert('Bạn vừa di chuyển chuột ra khỏi thành phần');
});.mouseleave()
Html viết:
<!DOCTYPE HTML>
<html>
<head>
<meta charset="utf-8">
<title>Tiêu đề</title>
<script src="http://code.jquery.com/jquery-latest.js"></script>
<script>
$(function(){
    $('img').mouseleave(function(){
        $(this).css('border','5px solid green');
    });
    $('button').click(function(){
        $('img').mouseleave()
    });
});
</script>
</head>

<body>
<img src="https://hoclaptrinh.vn/themes/client/img/code-screen.jpg"/>
<button>Click</button>
</body>
</html>
Hiển thị trình duyệt:
Khi click vào button, ta đã kích hoạt được giá trị mouseleave vào <img />, giống như vừa di chuyển chuột ra khỏi <img />.
.mouseleave(function(){...})
Html viết:
<!DOCTYPE HTML>
<html>
<head>
<meta charset="utf-8">
<title>Tiêu đề</title>
<script src="http://code.jquery.com/jquery-latest.js"></script>
<script>
$(function(){
    $('img').mouseleave(function(){
        $(this).css('border','5px solid green');
    });
});
</script>
</head>

<body>
<img src="https://hoclaptrinh.vn/themes/client/img/code-screen.jpg"/>
</body>
</html>
Hiển thị trình duyệt:
Khi di chuyển chuột ra khỏi <img /> ta sẽ thấy được kết qủa.
0 Bình luận
- Hàm jQuery (Selectors)
- Mở đầu
- .add() trong jQuery
- .addBack() trong jQuery
- .addClass() trong jQuery
- .after() trong jQuery
- .andSelf() trong jQuery
- .animate() trong jQuery
- .append() trong jQuery
- .appendTo() trong jQuery
- .attr() trong jQuery
- .before() trong jQuery
- .bind() trong jQuery
- .blur() trong jQuery
- .change() trong jQuery
- .children() trong jQuery
- .clearQueue() trong jQuery
- .click() trong jQuery
- .clone() trong jQuery
- .closest() trong jQuery
- .contents() trong jQuery
- .context trong jQuery
- .css() trong jQuery
- .dblclick() trong jQuery
- .delay() trong jQuery
- .delegate() trong jQuery
- .dequeue() trong jQuery
- .detach() trong jQuery
- .die() trong jQuery
- .each() trong jQuery
- .empty() trong jQuery
- .end() trong jQuery
- .eq() trong jQuery
- .error() trong jQuery
- .fadeIn() trong jQuery
- .fadeOut() trong jQuery
- .fadeTo() trong jQuery
- .fadeToggle() trong jQuery
- .filter() trong jQuery
- .find() trong jQuery
- .finish() trong jQuery
- .first() trong jQuery
- .focus() trong jQUery
- .focusin() trong jQuery
- .focusout() trong jQuery
- .get(n) trong jQuery
- .has() trong jQuery
- .hasClass() trong jQuery
- .height() trong jQuery
- .hide() trong jQuery
- .hover() trong jQuery
- .html() trong jQuery
- .index() trong jQuery
- .innerHeight() trong jQuery
- .innerWidth() trong jQuery
- .insertAfter() trong jQuery
- .insertBefore() trong jQuery
- .is() trong jQuery
- .jquery trong jQuery
- .keydown() trong jQuery
- .keyup() trong jQuery
- .last() trong jQuery
- .length trong jQuery
- .live() trong jQuery
- .load() trong jQuery
- .map() trong jQuery
- .mousedown() trong jQuery
- .mouseenter() trong jQuery
- .mouseleave() trong jQuery
- .mousemove() trong jQuery
- .mouseout() trong jQuery
- .mouseover() trong jQuery
- .mouseup() trong jQuery
- .next() trong jQuery
- .nextAll() trong jQuery
- .nextUntil() trong jQuery
- .not() trong jQuery
- .off() trong jQuery
- .offset() trong jQuery
- .offsetParent() trong jQuery
- .on() trong jQuery
- .one() trong jQuery
- .outerHeight() trong jQuery
- .outerWidth() trong jQuery
- .parent() trong jQuery
- .parentsUntil() trong jQuery
- .position() trong jQuery
- .prepend() trong jQuery
- .prependTo() trong jQuery
- .prev() trong jQuery
- .prevAll() trong jQuery
- .prevUntil() trong jQuery
- .remove() trong jQuery
- .removeAttr() trong jQuery
- .removeClass() trong jQuery
- .removeData() trong jQuery
- .removeProp() trong jQuery
- .replaceWith() trong jQuery
- .resize() trong jQuery
- .scroll() trong jQuery
- .scrollLeft() trong jQuery
- .scrollTop() trong jQuery
- .select() trong jQuery
- .selector() trong jQuery
- .serialize() trong jQuery
- .serializeArray() trong jQuery
- .show() trong jQuery
- .siblings() trong jQuery
- .size() trong jQuery
- .slice() trong jQuery
- .slideDown() trong jQuery
- .slideToggle() trong jQuery
- .slideUp() rong jQuery
- .stop() trong jQuery
- .submit() trong jQuery
- .text() trong jQuery
- .toArray() trong jQuery
- .toggle() trong jQuery
- .toggleClass() trong jQuery
- .trigger() trong jQuery
- .triggerHandler() trong jQuery
- .unbind() trong jQuery
- .undelegate() trong jQuery
- .unload() trong jQuery
- .unwrap() trong jQuery
- .val() trong jQuery
- .width() trong jQuery
- .wrap() trong jQuery
- .wrapAll() trong jQuery
- .wrapInner() trong jQuery
Hoclaptrinh.vn © 2017
From Coder With
Unpublished comment
Viết câu trả lời